

FORM ELEMENT
A form is a document with spaces, which enable us to field our data. Forms, when completed, may be a statement, a request, an order etc. however a check may be a form. Here we will be looking at HTML forms, what they are and how we can build or create them in various ways.
HTML FORMS
In HTML, forms are used to collect user input and it is usually sent to a server for processing, a form in Html is an element and it has an opening an a closing tag <form> </form>. The <form> element is seen as a container which has different types of input elements, by input we mean a field where users can enter data such as: text fields, checkboxes, radio buttons, submit buttons and a lot more.
So let's look at the <input> elements.
INPUT ELEMENTS
We learnt earlier that input means a field where users can enter their data or information about them, we should understand that data or information may come in different forms, it may be name, number or an email address etc. So the input element tends to aid us to allocate the type of data in each field, the input element has many types as we earlier mentioned, some of which are; the text, radio, checkbox, submit and button. The input does come with a caption like the type here helps to make us understand what type of input is required. let's explain the above listed
<Input type='text'>: The text value of input defines a single-line text entry field.
<!DOCTYPE html>
<html lang="en">
  <head>
    <meta charset="UTF-8" />
    <meta http-equiv="X-UA-Compatible" content="IE=edge" />
    <meta name="viewport" content="width=device-width, initial-scale=1.0" />
    <title>Form</title>
  </head>
  <body>
    <form>
      <label for="fname">First Name:</label>
      <input type="text" /><br /><br />
      <label for="fname">Last Name:</label>
      <input type="text"/>
    </form>
  </body>
</html>
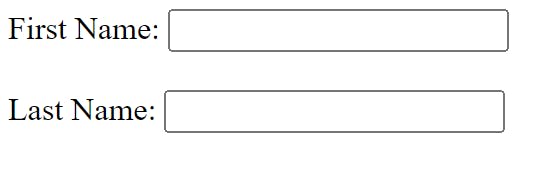 This is how it will be displayed on the webpage, if the code is been used correctly, the above result will help the user to insert his first and last name.
<input type='radio'>: It is a form element which allows the users to select only one option from the given set of options. it usually defines a radio button.
<!DOCTYPE html>
<html lang="en">
<head>
    <meta charset="UTF-8">
    <meta http-equiv="X-UA-Compatible" content="IE=edge">
    <meta name="viewport" content="width=device-width, initial-scale=1.0">
    <title>Radio button</title>
</head>
<body>
     <input type="Radio" id="club" name="fav team" value="club">
    <label for="Club">Chelsea</label><br>
    <input type="Radio" id="club" name="fav team" value="club">
    <label for="Club" >Manchester United</label>
</body>
</html>
 Above is the result from the browser
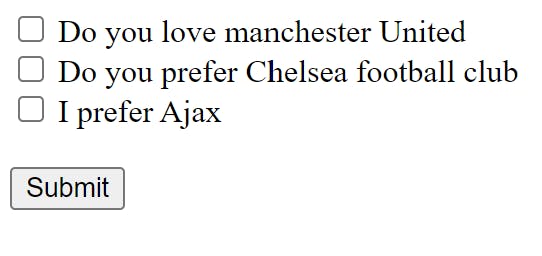
checkbox:Checkbox are usually boxes that are checked (ticked) when activated. Lets look at an example of it, before that, lets discuss.<form action="index.html">As we will see this in our line of code below; the form action helps specifies where to send the form data when a form is submitted. Below is our line of code:
<!DOCTYPE html>
<html lang="en">
  <head>
    <meta charset="UTF-8"/>
    <meta http-equiv="X-UA-Compatible" content="IE=edge"/>
    <meta name="viewport" content="width=device-width, initial-scale=1.0" />
    <title>Form</title>
  </head>
  <body>
  <form action="index.html">
      <input type="checkbox" id="man united"name="Manchester united" value="Club">
      <label for="Manchester">Do you love manchester United</label><br>
      <input type="checkbox" id="Chelsea" name="Chelsea"value="Club">
      <label for="Chelsea"> Do you prefer Chelsea football club</label><br>
      <input type="checkbox" id="Ajax" name="Ajax" value="Club">
      <label for="Ajax"> I prefer Ajax</label><br><br>
      <input type="submit" value="Submit">
    </form>
  </body>
</html>
Lets also look at how it will appear on our webpage, below is a brief example.
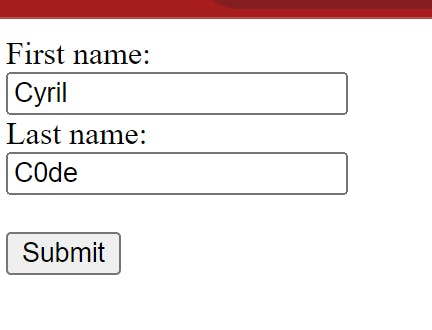
<input type="submit">it defines a button for submitting the form data to a form-handler. The form-handler is usually specified in the form's action attribute. lets look at this code below:
<!DOCTYPE html>
<html lang="en">
  <head>
    <meta charset="UTF-8" />
    <meta http-equiv="X-UA-Compatible" content="IE=edge"/>
    <meta name="viewport" content="width=device-width, initial-scale=1.0"/>
    <title>Submit</title>
  </head>
  <body>
    <form action="/action_page.php">
      <label for="fname">First name:</label><br/>
      <input type="text" id="fname" name="fname" value="Cyril" /><br/>
      <label for="lname">Last name:</label><br/>
      <input type="text" id="lname" name="lname" value="C0de" /><br /><br/>
      <input type="submit" value="Submit"/>
    </form>
  </body>
</html>
lets see how it will be displayed on our webpage.
CONCLUSION
There are so many HTML form elements available; in this article, we have discussed some of the basic form elements that can aid you understand forms better. This elements helps us to create proper and functional HTML forms.
Hope this was helpful, Thanks for reading.